Introduction
I’ve been peddling the myth of Bethesda and its world famous sourdough bakery, Bethesdabakers, for years. Posts I sent to various internet breadforums under the name “Bethesdabakers” suggested a place in Snowdonia whose moist climate puts it a little ahead of San Francisco as the perfect location for producing sourdough loaves. Periodically I reinforced this suggestion by posting photographs “from the bakery webcam”. So by the time I organised Bethesdabakin’, an international baking event held at the village’s rugby club in 2007, a lot people were convinced that I actually ran a bakery here.
Well I do now. I set up a microbakery towards the end of 2007 in our little terraced house where I knocked out around 150 naturally leavened loaves in the course of a weekly two-day bake. I started off baking seven regular breads each session and during the first few months introduced a weekly special, a rye and a flatbread which became augmented with sweet and savoury brioches, other enriched doughs and festive breads for all occasions. These specials were developed to produce variety to maintain the customers’ interest. On top of this I began supplying a freelance chef who changed his menus and regional cuisines every week and wanted breads which didn’t have to be exactly authentic but needed to reflect some aspect of the weekly theme. So within a year or two the repertoire had grown to over one hundred breads of all types.
You can read the story of how I arrived at this point, the history of the bakery and learn how to set up your own microbakery in “Microbakin’ – Baking Bread for Sale at Home”.
This book is a sourdough primer giving you clear, simple steps for making good bread using a selection of recipes from the Bethesdabakers’ repertoire. It is the first in a series of ebooks for sourdough bakers showing you how I work and providing you with breads from my wide ranging repertoire.
I have deliberately kept the book simple (without cutting corners or sacrificing quality) to make it suitable for absolute beginners. However there is an awful lot of bad and incomplete information in circulation about sourdough and more experienced bakers may well benefit from using the book to reappraise their bread making methods.
Naturally Leavened Bread
Naturally leavened bread is a bit of a mouthful, as you might say. But it’s a better description than its more common name,sourdough, which people can find off-putting with its implied acidic taste. Itcan be sour but only if you set out to make it that way. It certainly does have more flavour and substance than commercially yeasted, supermarket and factory breads.
Naturally leavened bread uses wild yeasts in a starter as a raising agent instead of commercial yeast. A starter is made by mixing a paste of flour andwater and letting it sit until it becomes active with natural yeasts and benign bacteria when it will begin to ferment and bubble. Once this happens more flour and water is added to the mix which feeds the natural yeasts and keeps the process running.
The baker takes a portion of this starter and makes his bread dough withadditional flour, water and salt. The gas produced by the natural yeast in thefermentation process causes the bread to rise and the lactic acids produced bythe bacteria give the bread flavour.
The baker holds back the remainder of the starter, refreshes it (feeds it withmore flour and water) and keeps it for the next bake. Saving disasters, thisprocess can be continued indefinitely. My current starter has been bubblinghappily since October 1999.
There is no legal definition of sourdough but the stuff labelled as such insupermarkets almost certainly isn’t. For the most part it is yeasted bread withadded flavouring – powdered starter, lactic acid, even lemon juice or vinegar.
It is often forgotten that bread is a fermented food – and fermentation takestime. Time is what has been eliminated from the commercial baking process andit has been suggested that the increase in wheat intolerance is at least partlydue to the fact that doughs are no longer fermented properly. And that’s as faras I am prepared to go down the pseudo-science path.
You don’t need health reasons to eat sourdough. It tastes and looks good – ithas texture, flavour and crusts you need teeth for. The length of fermentationgives it several days shelf-life and it ages rather than stales so that itscharacter changes as it gets older.
There is no limit to its variety – any bread that can be made with yeast can bemade with leaven.
The basics of making a sourdough loaf are so simple I can describe them in afew sentences. Weigh out flour, water, starter and salt and mix them in a bowluntil they come together. Scrape the mix onto a work surface and knead forthree short periods with brief rests in between. Allow the dough to rise for 4hours, shape it and let it rise for a further 3½ hours. Slash the top, bake for50 minutes, cool.
It really is that straightforward. All that stands between you and yourobjective of becoming a baker is access to an active starter, having a few moredetailed instructions and a bit of pluck which will develop into confidence andjudgment with a little practice.
Before moving on to making a starter I just want to say a little about the wayI feel about bread and bread making. The transformation of flour and water intobread is a truly amazing phenomenon and is beautiful in its simplicity: starter(fermenting flour and water) + flour + water + salt + heat = bread. Thatperfect simplicity should be treated with respect: you can’t improve on basicbread. So, use the finest ingredients that are available to you and set out todevelop a feel for the stages the dough goes through. Don’t add anything to thebasic ingredients (flour, water, salt) without a reason. A reason could bebecause you fancy olive bread or a sweet breakfast bread or even adding a jokeingredient because it’s Halloween so long as you know why you’re doing it. Butadding sugar and fats routinely as a lot of recipes require is totallyunnecessary and using ingredients to make up for your lack of baking skills(commercial yeast, ascorbic acid, etc) deserves vile and horrible punishment.Keep yourself rooted in the basic breads.
Makinga Starter
Never trust a baker who will not give you some of their starter to get yougoing (or to rescue you in an emergency) – and I mean give and not sell. Youcan buy starter over the net but reports about their reliability are mixed andsome of their claims are rather far fetched. At the end of the day, most peoplewant ownership of their starter; to know that they began the process offermentation, nurtured it until it became mature, and maintained it into oldage.
The only problem arising from this is that beginners tend to make the wholething too personal; they worry if their starters don’t thrive, they takefailure to heart, they get emotionally attached to their starters and give thempet names. The process of making bread is dramatic enough without gettingromantically involved with your starter. You can afford to be dispassionate andaccept that a starter is just a fermenting paste of flour and water. You canprobably start using it within seven or eight days, but it may be a littleprecarious for several weeks while it becomes stable. Then, with a little care,it will probably last forever. But its age has no relevance. After those firstfew months it doesn’t keep improving like fine wine. I know, a few paragraphsago I said that my starter was made around 2000 and at about the same time I obtaineda rye starter from Andrew Whitley’s Village Bakery (now Bread Matters) that wassupposed to be over a hundred years old – and from Russia to add to themystique. But it’s all kidology – it doesn’t make it any better. So if one dieson you, make another.
Let’sMake a Starter
You don’t actually “make” a starter; you try to create conditions favourable toflour and water starting to ferment and then, when fermentation has begun, tonurture the process until your mixture is fully active. Finally you need toknow how to maintain your starter so that it can provide you with a lifetime ofgood bread.
(Notes: You may hear from other sources a number of names for “starter” or thestages a starter is at – levain, mother, chef, preferment, etc. You can checkthese out later in your baking career if you want but “starter” is the onlyname I will be using in this book.
Some authors give methods for starter creation that use grapes, raisins, honey,yoghurt, etc. because they claim that the outcome is more dependable. Nothingwrong with that except that it gives growth to myths such as it is impossibleto make a starter unless you have black grapes with white mould on them. It iseasy to find such methods on the internet. I advise you to avoid famous names who are not sourdough specialists andto make sure you use pure ingredients.)
This method just uses flour and water which after all are the ingredients youwill be baking with. Contrary to popular opinion you are not waiting fornatural yeasts to fall from the sky into your jar, the yeasts arrive with yourflour just waiting to become active. I have used this method several timeswithout failure but I have never done it without a scare in the process.Bubbles appear, you think the mixture’s active only for them to disappear.Persevere! It is probably gas producing bacteria becoming active and fadingbefore the yeasts start to work.
Mix 50g of strong white bread flour with 50g water to form a paste.
Use a non-corrosive container – glass is useful, something like a jam jar is agood size at this stage – because you can see what’s going on, but notessential.
Cover the container to stop foreign bodies falling in and to stop the mixturedrying out. Don’t seal the jar unless you want it to explode! Keep at ambient(room) temperature – around 20C-30C.
Within 48 hours there will probably be gas bubbles forming. If there are no
signs of activity after three or four days throw it out and start again
Once there are definitely signs of activity, refresh the starter by taking 50g
of the mixture and stirring in the same weight of water and the same weight of
flour. Throw out the remaining mixture
Wait until your new mixture is producing bubbles (give it at least 12 hours and
don’t worry if it is longer) repeat the previous refreshment
Repeat for two or three days until the activity in the starter is vigorous.
You can bake your first loaf within seven or eight days if your starter is
successful but it will continue to gain strength and stability over a longer
period.
Starter
Maintenance
Once your starter is active, keep it at room temperature and refresh every 12
hours or so (morning and evening) until you feel it has become established. Then,
unless you are baking
several times a week, it is probably best
stored in the fridge and refreshed weekly. If kept at room temperature switch
to 24 hour refreshments. You may be concerned at using only 50g of starter per
refreshment and discarding the rest. But if you don’t, within days you’ll have
kilos of the stuff; when we reach the next stage we’ll be able to control the
waste more easily.
Your starter is made up of equal weights of flour and water (what is known as
100% hydration) and we have been refreshing it at a ratio of 1:1:1 (50g
starter: 50g water: 50g flour).
I’m assuming you are going to be so eager to make your first loaf you’ll want
to do so at the earliest opportunity. Bear in mind that sourdough is a two day
process. So the day before you bake, in the morning make up two refreshments,
one for your loaf and one to be kept for subsequent bakes – let’s call the latter
the store starter.
Make up two mixes of 50g starter, 50g water, 50g flour = 150g. Cover them both
to stop them drying out – put one, your store starter, in the fridge and leave
the other at room temperature.
In the evening refresh the starter that was left at room temperature again at a
ratio of 1:1:1, Most of the recipes in the book call for just under 150g of
starter so if you are making a single loaf you can take 50g starter, 50g water,
50g flour. If you are doing two loaves use 100g:100g:100g. In the morning this
will be ready for your final dough.
Your store starter is now safely in the fridge. For the moment, until it has
matured and is stable, it is advisable to refresh it once a week. This is no
great hardship. If the bread bug gets you you will probably want to bake on at
least a weekly basis. Assuming you bake on a Saturday, on Friday morning take
your store starter out of the fridge, make up two refreshments, put one back in
the fridge, leave the second one out for an evening refreshment which will go
in Saturday morning’s dough.
All sorts of different hydrations and refreshment proportions are possible once
you have mastered the basics of sourdough baking. But please stick to my
methods until you are confident of what you are doing. Remember that to keep a
starter healthy you must at least double its weight when you refresh it.
Beginners often think they will swamp a starter by large additions of flour and
water. However this is necessary – small additions will weaken and starve your
starter over time.
Starters become amazingly resilient once they are established and, contrary to
popular belief, are quite hard to kill. Exposure to high temperatures will do
it but they can be stored in the fridge for months, frozen or dehydrated and
revived at a later date.
Equipment
You don’t need any specialist equipment to start making bread. That sentence
was the reason a specialist baking equipment company refused to stock the
original edition of this book. So it must be true.
Everything you need probably already exists in your kitchen so, before you rush
out to spend money, it’s worth considering your motivation. Do you want to look
like a baker or produce good bread? The two aren’t mutually exclusive of course
and if you can afford it why not spend out on good gear, although thank God pro
bakers don’t wear Lycra. On the other hand there is no need for any large
outlay of money.
You won’t get far, with these recipes anyway, without an oven but you probably
already knew that. It doesn’t need to be an expensive oven; some of my best
bread comes out of the cheapest domestic oven we could find from a store “never
knowingly undersold”.
Unless you have a disability you don’t need a mixer in fact a mixer can be a
hindrance to understanding your dough. Get your hands in there – it’s the only
way to learn!
Digital scales are a huge help and are
pretty cheap these days. You can put your mixing bowl on the scales add the
first ingredient, zero the read-out, add the second, etc. Get used to metric,
weigh everything in grams, including the water (but a handy thing to know: 1ml
= 1 gram).
1n 2007 when I started baking for sale and after 15 years of home baking, this
was pretty well all I had in the way of equipment: an assortment of baking
sheets and baking tins, a ragbag of mixing bowls for starters and doughs, a
collection of baskets for proving dough, a dough scraper, a brush for sweeping
up flour, a pastry brush, a probe and background thermometer, a razor and razor
blades, a set of digital scales and a jug (for pouring not measuring). Not
shown is a heap of cotton tea towels for lining proving baskets, covering
dough, etc. You will read in other places that only linen will do otherwise
dough will stick to the cloth but I have never had a problem with cotton. I
indulged myself with one very expensive, smart, 2 kilo, lined proving basket
which is a lovely object but quite unnecessary.
You need some sort of plastic sheeting to place on top of the cloth covering
your dough to prevent evaporation. This could be a polythene bag, cling-film whatever’s
big enough to cover the area. Having overestimated the amount of bubble-wrap I
needed for presents one Christmas, this is what I currently use.
Flours
The main flours required for the bread formulas in this book are Strong White
Bread Flour, Wholemeal Wheat Flour and Wholemeal Rye Flour.
The information supplied by the flour companies is pretty pathetic but you will
usually be able to spot the protein content on the packaging and this gives you
some guide to the gluten content. This should be around 11.5% and most
supermarket bread flours will be around this level. Avoid products with names
like “Very Strong Canadian Bread Flour” weighing in at about 14.0% which sound
perfect but ain’t.
Use organic. I’m not saying the flavour is better but the means of production are
kinder to the soil, there is no run-off of nitrates into rivers and, anyway,
why eat pesticides?
Wholemeal Rye Flour, in addition to its bread making uses, is also essential
for dusting proving baskets and baking sheets.
Bread Making Cycle
We’ve looked at producing active starter for dough-making: one refreshment
about 24 hours before the dough is to be mixed followed by a second refreshment
12 hours before the mix.
Practical example – Day One: refresh starters in the morning and in the
evening. Morning Day Two: mix the dough.
After the dough is mixed it is allowed to rise twice: the first rise is called
Fermentaion (Bulk Fermentation if you are making a number of loaves because
they are not weighed and shaped until the end of this period); the second is
the Proof.
The rising periods will vary according to the temperature and type of dough,
but, as an example, in a temperate climate like the UK my timing is routinely 4 hours fermentation,
3½ hours proof.
The oven is preheated to 200-220C.
After being proved the bread is baked for about 50 minutes.
The final stage is cooling. The bread is cooled on a rack with space for the
air to circulate.
Dough Making
Basics
When you first start baking, everything that will shortly become
straightforward and simple seems awkward and intimidating. Which brings us to
the first Great Truth of Bread Making: dough is sticky. No, you are not doing
it wrong, dough sticks to your hands, to work surfaces, to everything it comes
in contact with. That’s why they make glue out of flour and water. And that’s
why God made dough scrapers – to scrape the dough off your hands, work
surfaces, and everything else it has come into contact with.
As an untidy person I can assure you that it pays to do a little preparation
before you start mixing:
Clear an adequate space in which you will be comfortable working.
Clear the sink and have a bowl of warm water in it.
Always keep your dough scraper in the same place near your work surface so that
you just have to reach out your hand and it’s there.
Take out all of your ingredients and equipment before you start.
Have a bowl of flour on your work surface to flour your hands.
Simple things, but they can avoid a lot of frustration when your hands are
covered in dough and the vital object is missing.
Mixing, Kneading
& Stretching
A large,lightweight, bowl is best for mixing. Add the water first so the flour sticksless to the bottom and sides, stir in any other liquid ingredients, then thestarter, followed by the flour and salt.Use your hands for mixing; this will give you amuch better feel for what you are doing. Start gently so that you don’t causeexplosions of flour to shower the surrounding kitchen, scraping down the sidesof the bowl with one hand and stirring as you revolve it with the other. Whenthe flour is a little damped down, repeatedly squeeze the mixture through yourfingers until you have a reasonably homogenised dough. A minute or two’s work.
Scrape the dough onto your work surface. Knead by pushing the far side of thedough away from you with the heel of your lead hand whilst pulling the nearside towards you with the knuckles of your other hand. Roll the far end back tothe near end to form a cylinder, give the dough a quarter turn then kneadagain. Knead ten times then rest the dough for ten minutes.
Do this three times. So it’s:
Mix in the bowl, knead 10 times on the work surface, 10 minutes rest
knead 10 times, 10 minutes rest
knead 10 times
Make a rough ball with the dough, place in an oiled bowl, seam side down, andcover with cling film or similar to stop the dough drying out. Allow to fermentfor about four hours.
To flour or not to flour? Some peopledust a little flour on the worktop when kneading, others spread a film of oil.Having tried all the combinations generally speaking I don’t use anythingexcept maybe a little flour at the end when I’m rounding up the dough and whenI’m dividing and shaping dough before proving. What you should do is keep yourhands floured – if the dough starts to stick to them, drop it on the worksurface and reflour your hands.
During the fermentation period you can improve the structure of the dough bygiving it a stretch roughly once an hour. Take the dough out of the bowl andgently stretch to form a rectangle. Fold the dough over itself in thirds (foldone end over two thirds of the dough and fold the other end over that).
Turn the dough a quarter so that the right side is nearest to you and repeatthe stretch and fold. Reshape the dough into a rough ball and return to thebowl. This is not essential especially if you have other things to do duringthe fermentation period.
Shaping & Proving
The most common shape for the majority of the breads in this book is a round orboule. Improvise a proving basket. Find a cane basket about 8 inches indiameter or a colander or just a bowl, line it with a tea towel and sprinkleliberally with rye flour.
Lightly sprinkle your work surface with a little strong white bread flour.
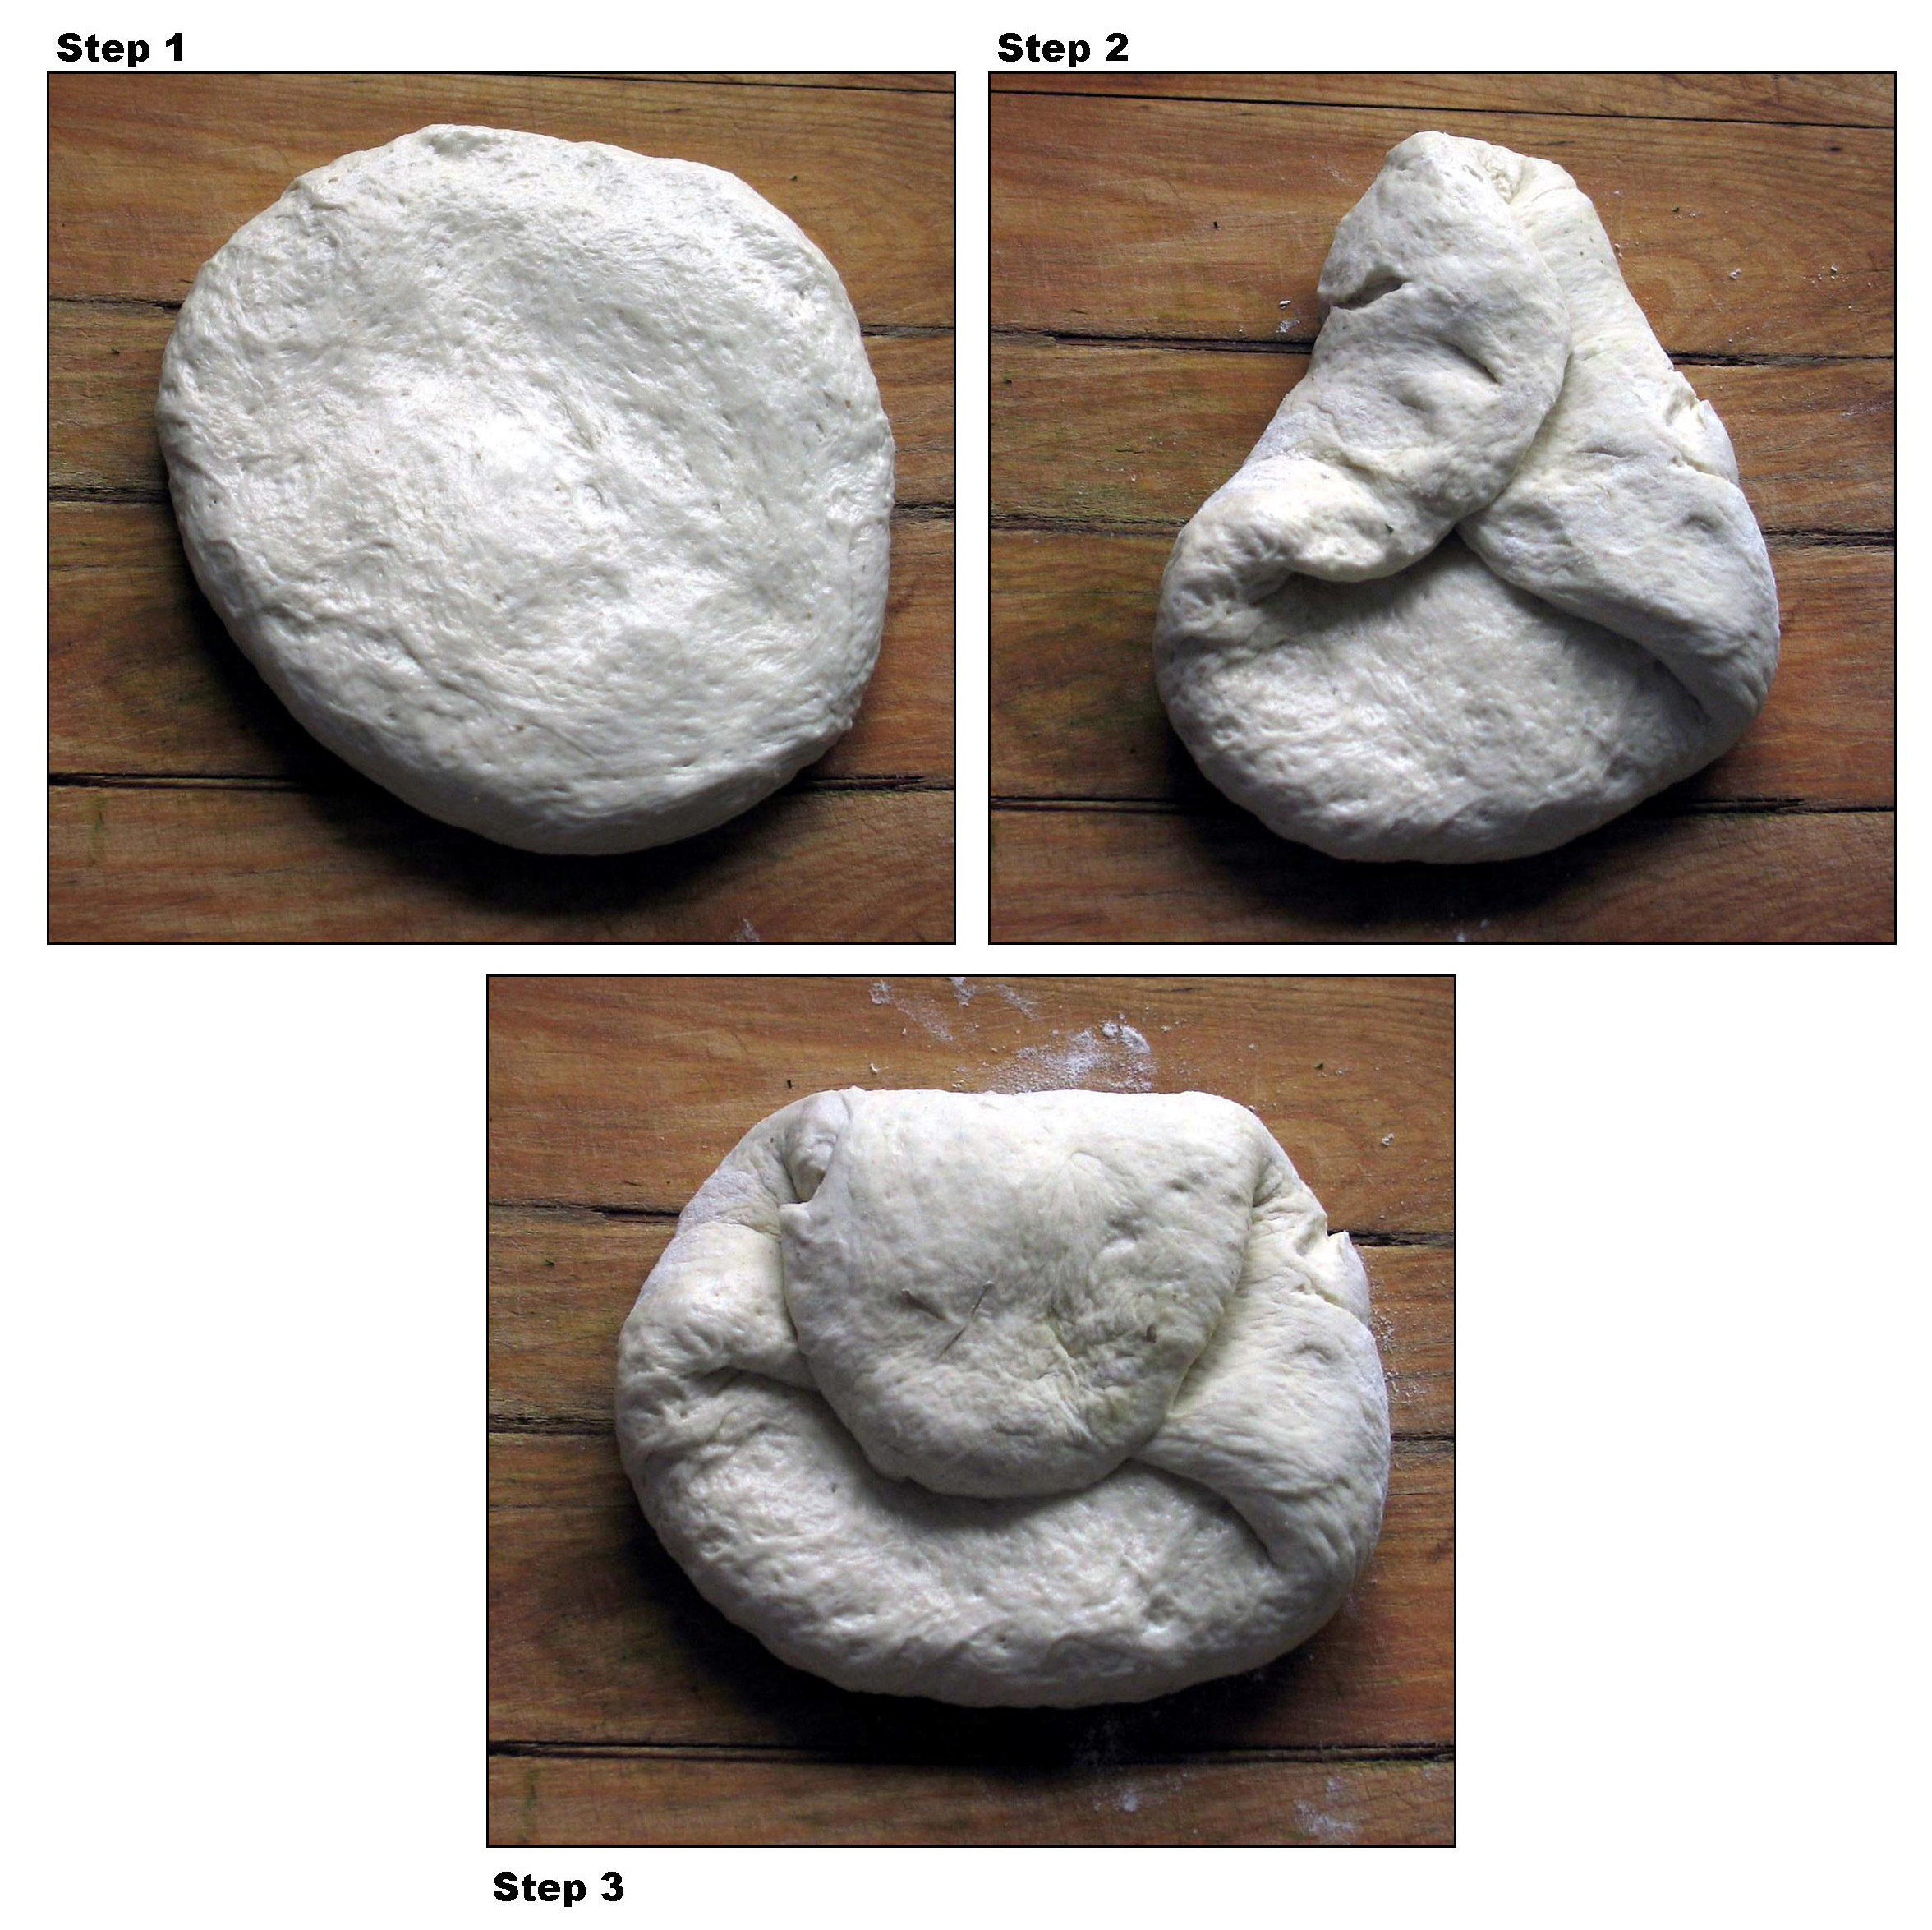
Step 1: Place your
dough on the work surface, seam side up, and press it out into a circle with
your fingers. Lift the dough to make sure it’s not sticking. Step 2: Fold the
left and right edges of the top half of the circle into the centre. Step 3:
Fold the top edge down to just beyond the centre line and press firmly with the
heel of your hand to seal.
Step 4: Turn the whole thing round so that the end nearest to you is now
furthest away. Fold the left and right edges into the centre. Step 5: Fold down
the top left and the top right corners into the centre to give you a round,
then seal firmly again with the heel of your hand.

Step 6: Turn it over. Cup your hands around the ball and stretch the dough underneath itself repeatedly while turning the ball . Keep the dough in contact with the work surface and you will see the ball tighten as it drags on the work surface and seals the folds. Press on the top of the ball to complete the seal.

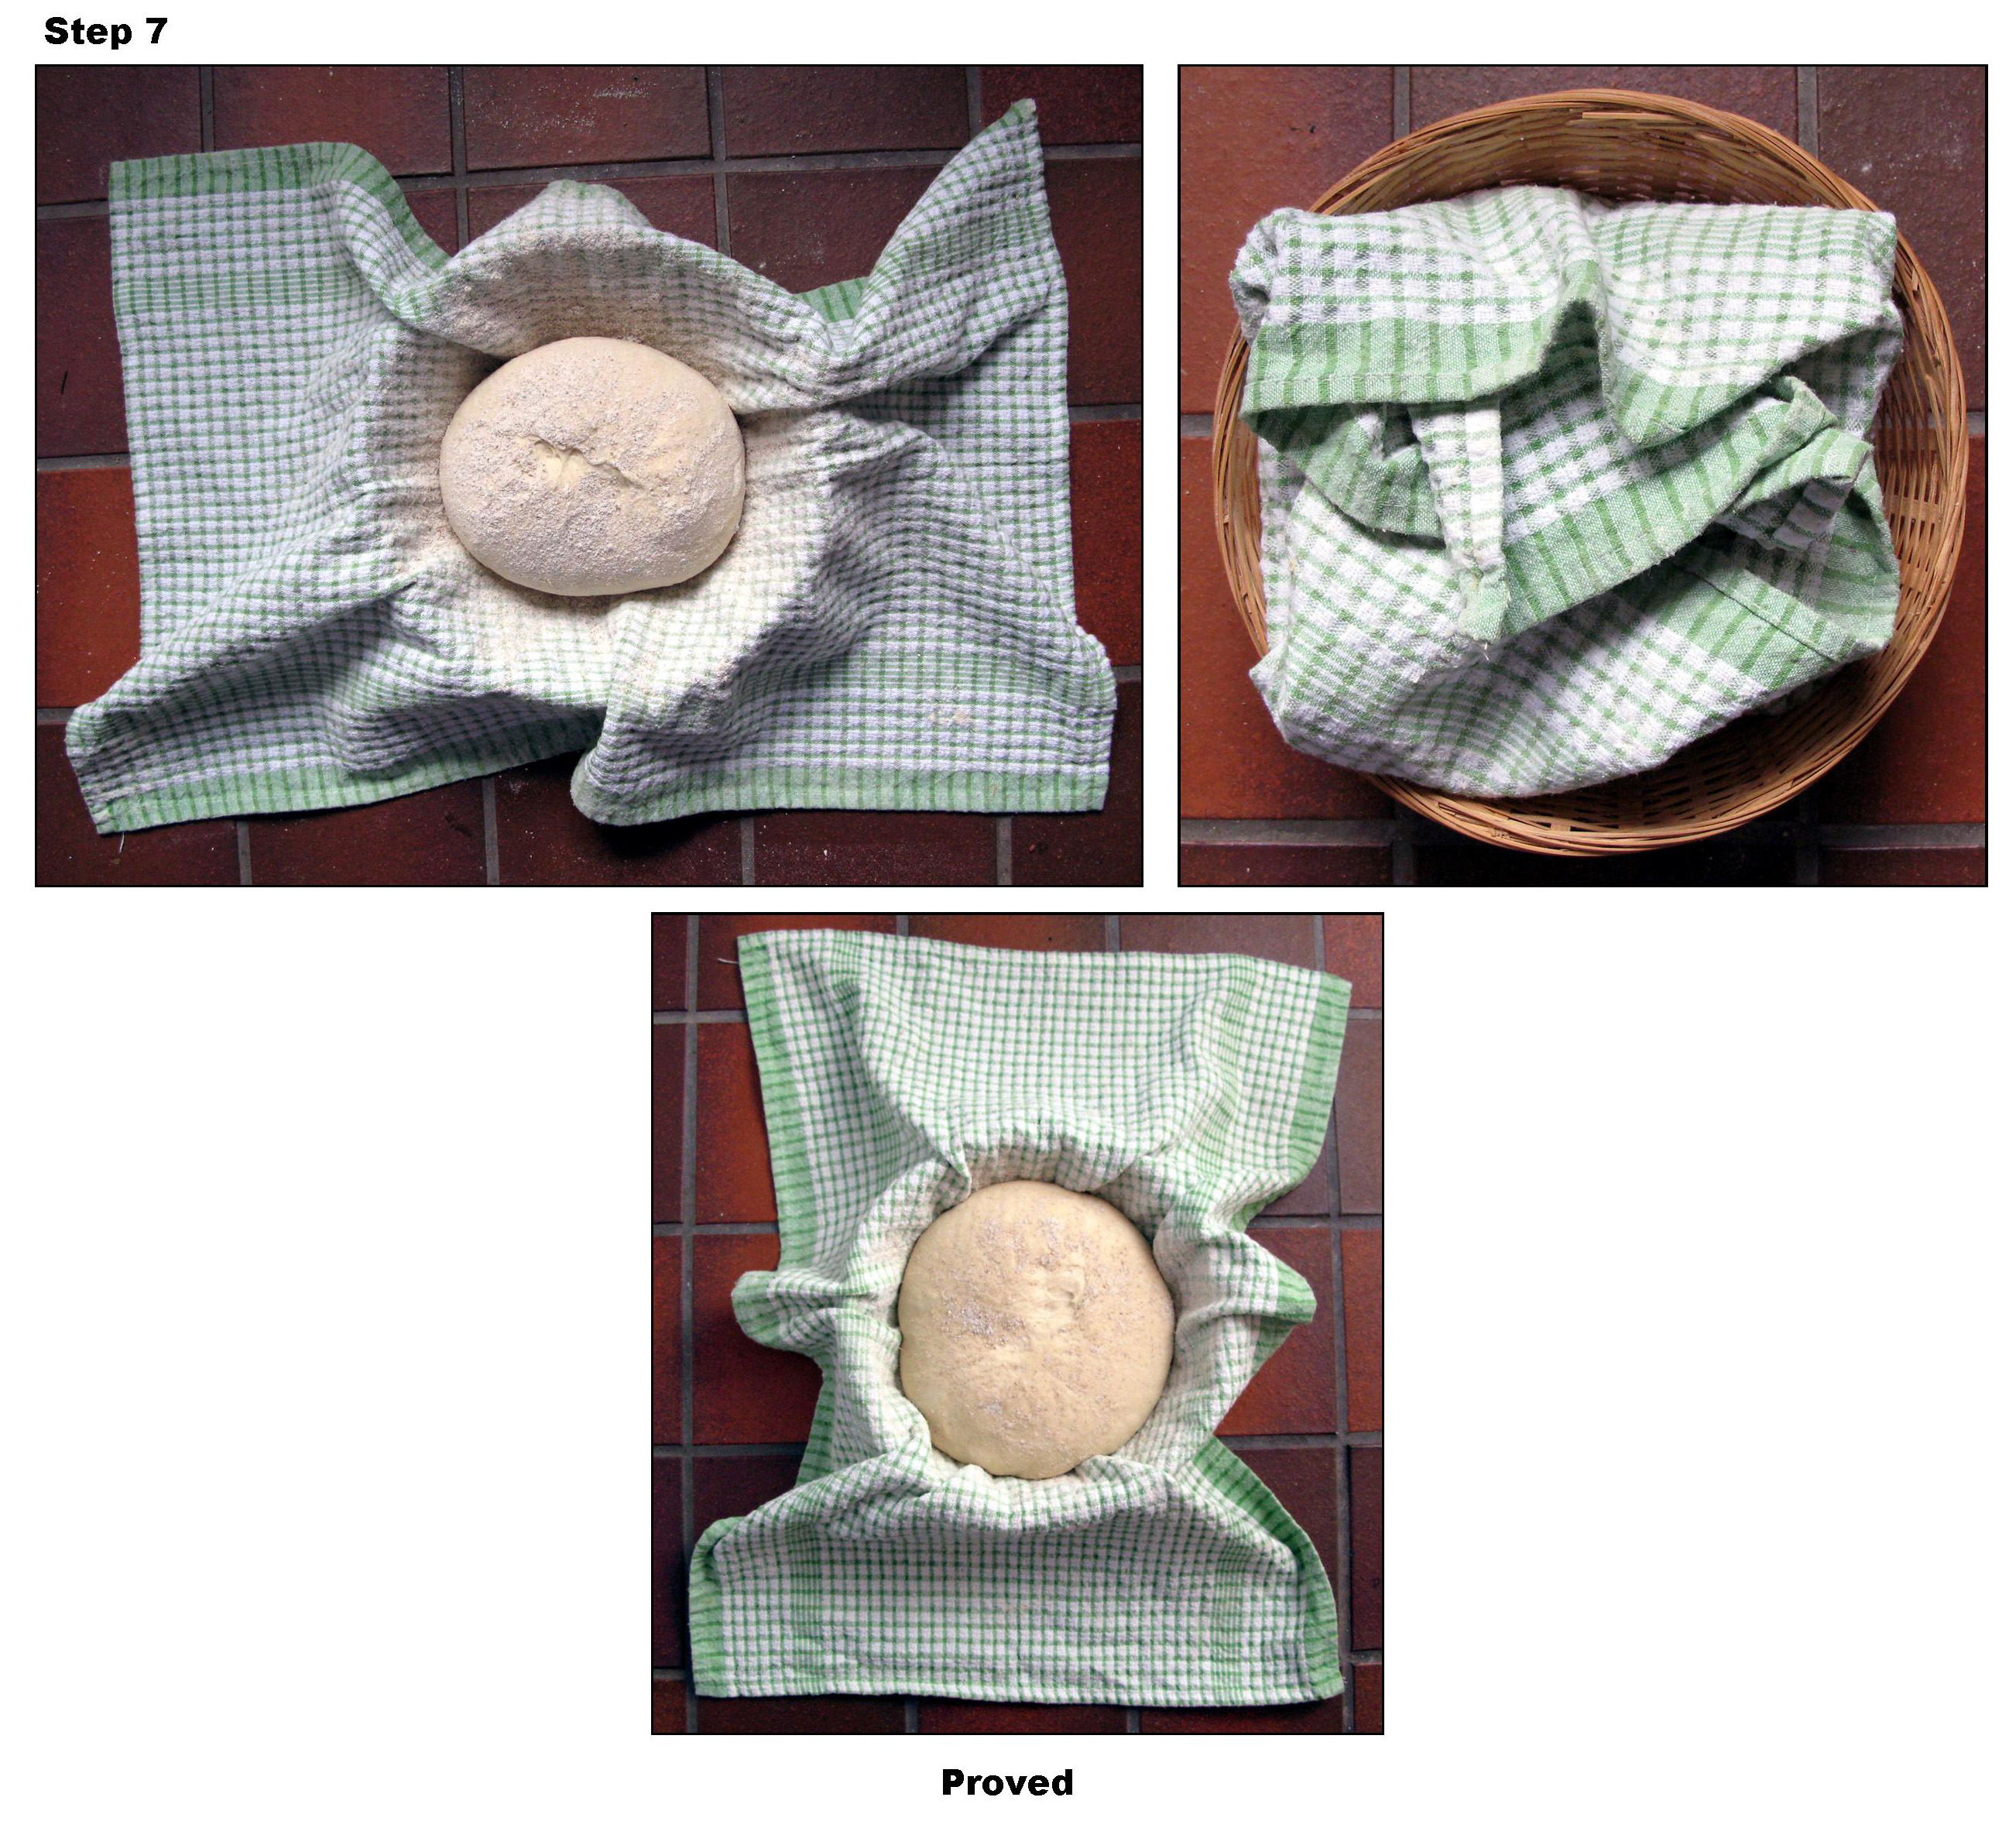
Step 7: Place the
dough ball in the container seam side up, fold over the corners of the tea
towel and cover with plastic sheet. Allow to prove at room temperature for
about four hours. You can monitor the dough’s progress by lightly pressing it
with a floured finger. In the early stages the indentation will close rapidly but
this becomes slower as it proves. The perfect stage is when there is still a
little push left in the dough. This takes experience to recognise so for your
first effort give the dough 3½-4 hours.
Preheat
your oven to about 210C. It will take 30 minutes to do this properly. Flour a
baking sheet with rye flour. Gently turn the dough out onto the baking sheet.
Make a number of slashes in the surface of the dough with a razor blade or
sharp serrated knife and place in the oven.
Bake for 50 minutes checking after maybe 30 minutes – if it starts to burn turn
the oven down to 200C.
If you have a probe thermometer the internal temperature of the baked loaf
should be around 95C.
Cool completely on a wire rack.
